After my video tutorial in the last post, I thought a short follow up post with a detailed example would be helpful. So, no video today, but some further explanations on how I scanned the photograph below. But just in case you have missed the video, I highly recommend going back and watch it. It will give you a good overview of all the tasks required during the scanning process.
Fuji Frontier scan by MeinFilmLab
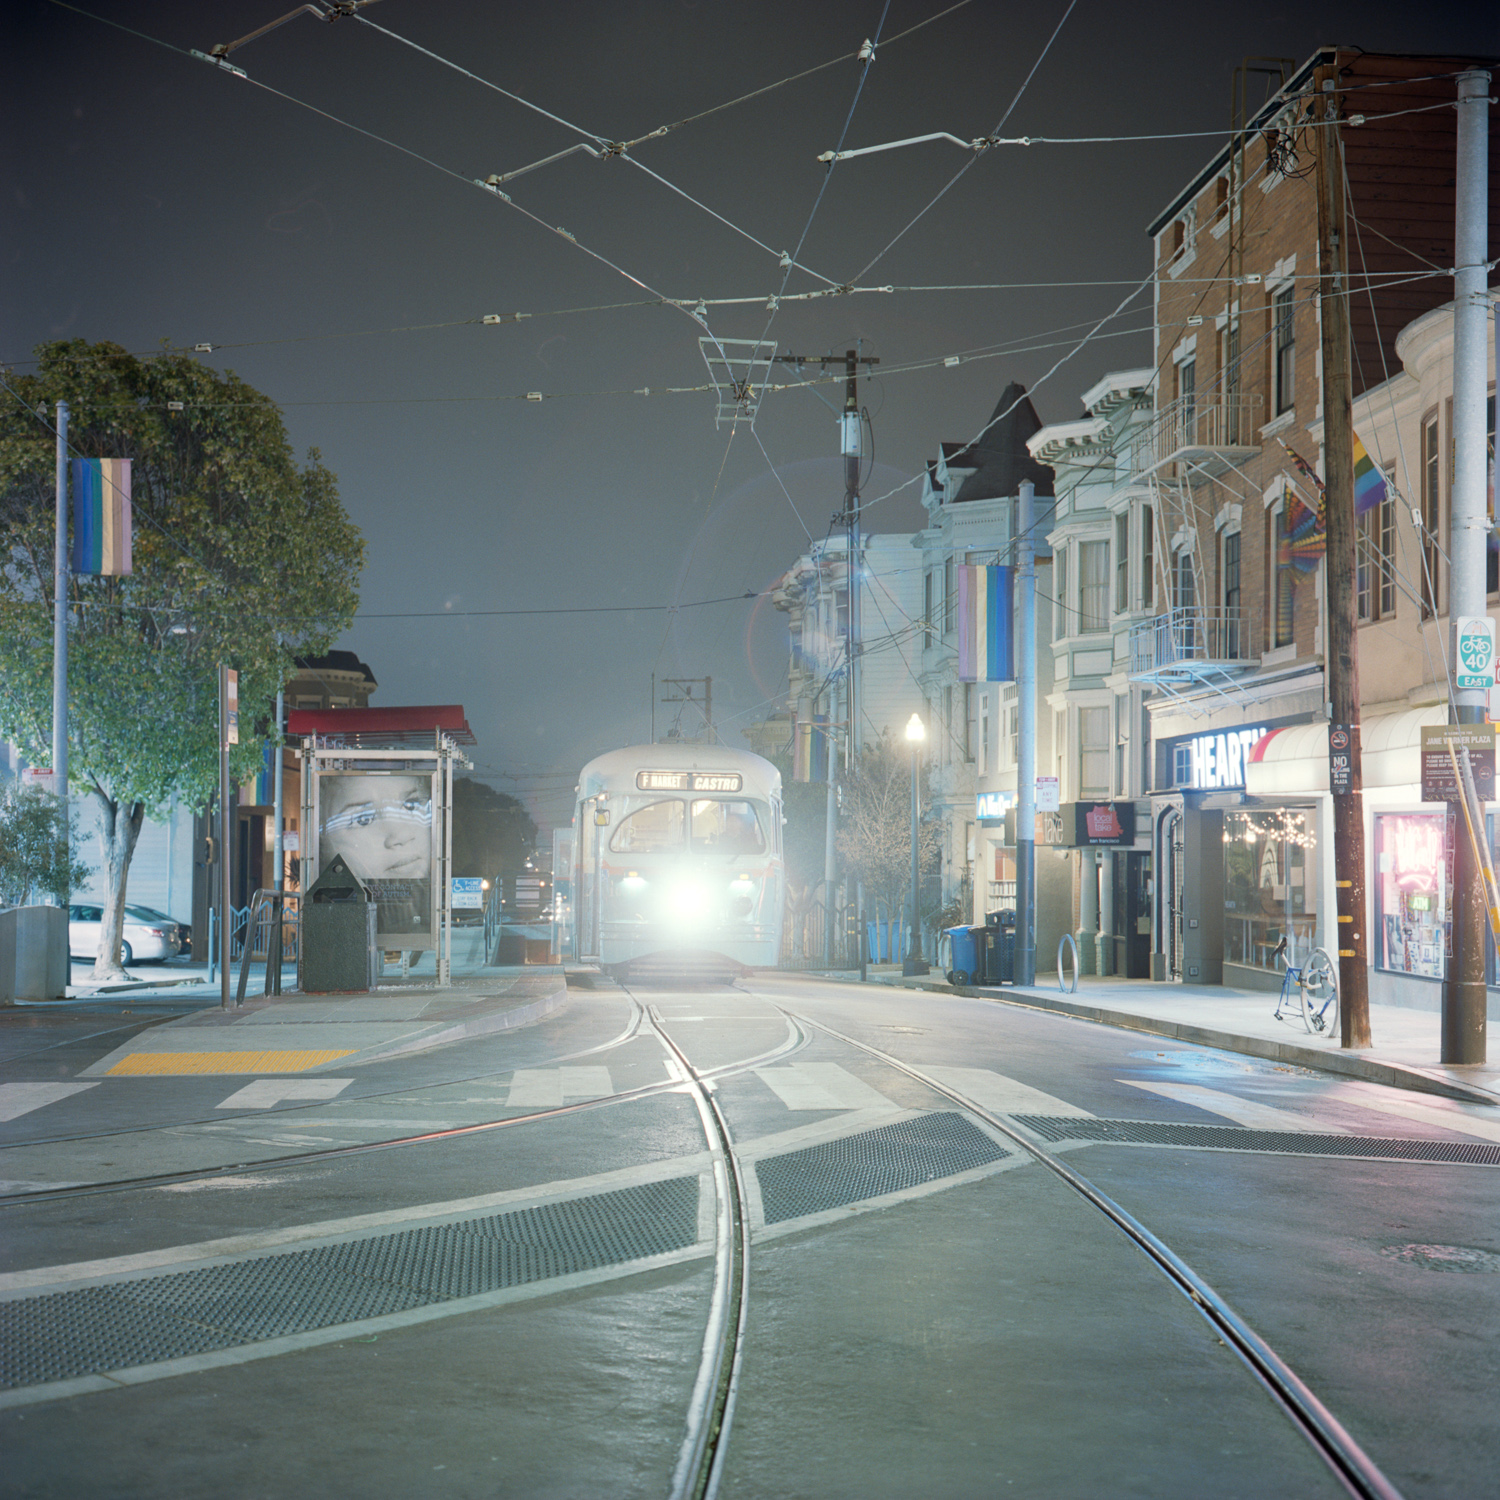
The Photograph
I took this image very early in the morning in Castro. Castro is one of the most colorful and interesting neighborhoods of San Francisco and always worth a visit. I had my Rolleiflex 3.5F mounted when I was roaming around the streets. It was a cold but very beautiful morning in San Francisco and only a few people were on the streets. I found this street scene and I was immediately caught by the interesting composition. The measured exposure time for the scene was 15 sec. and I exposed it at f/8 for a little longer than 45 sec. The increased exposure time was to compensate for the reciprocality failure of the Kodak Portra 400 film. I normally rate Portra 400 film at an exposure index of EI 200. The Carl Zeiss Planar lens of the Rolleiflex shows an incredible amount of detail and sharpness. The strong linear perspective of the composition was chosen to draw the viewer into the scene directly to the iconic tram which was waiting for the first passengers.
Scanning
Back at home I was very happy how this shot turned out. The lab provided me two scans, a XXL Noritsu scan and a Fuji Frontier XL scan. Below you can find a comparison between these two minlab scans and the Epson scan I did later at home after I received my negs back. For scanning at home with a consumer scanner, mounting is crucial. During the last month I optimized my mounting solution for the Epson V700 scanner. I now use a Lomography Digitaliza frame with a self made support. The support compensates for the wrong distance between the lens and the film and provides sharper scans. I might come up with a special blog post to explain this solution in detail.


Silverfast
As I have mentioned in my previous post, Silverfast is my dedicated scanner application as will give me the best scans from my Epson scanner. Here are the steps I do in Silverfast followed by some tweaking in Adobe Lightroom.
Scanning Frame
In order to allow the Negafix algorithms to work correctly we need to make sure that we define the scanning area with the red frame inside the exposed area of the film. Negafix is a powerful tool that will take care of negative inversion, contrast and color curves as well as orange mask removal. The LaserSoft Imaging engineers have put a lot of effort into this tool and they created film profiles. These profiles will ensure a good starting point for your scan. The red frame will not only determine the scanning area but it will also tell Negafix which pixels to look at. If large parts of the carrier or holder are included inside the frame chances are that the the colors are not right from the beginning.
Negafix
After selecting the scan area first thing I normally do is to select the correct Negafix profile. This helps me to get the best results from my scan. The profiles are the first step towards the final scan. Next we deal with the exposure slider. This slider will shift the profile curves according to the used exposure index. As I have used the EI (exposure index) of 200 I should at least select 1.0 with the slider. As I often measure for the shadows I probably get even better results with higher settings as the scene was overexposed even stronger due to the method of measuring. When we over- or underexposure a scene we have to deal with certain color shifts as the color layers of the emulsion show individual sensitivities. Overexposing Kodak Portra for example normally results in a slight yellow color cast. Using the exposure slider you can compensate for this. The exposure slider will also compensate for the dense negative that comes from overexposure and will adapt the tone response curve accordingly. Generally speaking the exposure slider is not changing scanner exposure its changes the way the information is interpreted. Going to the right the image will however brighten, while moving the slider to the left will darken the image. This is not compensating for wrong exposures it is more step towards getting the tonal response curve right.


Watch the right side of the histogram when adjusting the "Tolerance Slider"
When setting the exposure slider, I normally start at a value which I think is right for how I exposed the scene. If the look of the preview is however not according to my taste, I start moving the slider until I get the look that I want. Sometimes this even requires changing towards a direction that initially seems wrong.
Another important slider is the "Tolerance" slider. It will change the way Negafix is correcting the "Orange Mask". As all three color emulsion layers of a negative film will show different densities, the resulting combined appearance of the film will look orange. During printing a darkroom printer will remove the mask by color filtration. Why this is beneficial for the color quality is another story and not really important for us at the moment. All we need to know is that this orange mask has been deliberately engineered for better color printing. During scanning we want to reduce this mask by neutralizing the histogram. Neutralizing the histogram means spreading the tonal value in each color channel to full extend. This is done by setting the black and white point individually for each color channel. The "Tolerance Slider" will determine the extend of this neutralization. This might even include clipping of the color channels, which we would like to avoid. When using the Tolerance slider always have an eye on the histogram. Go as far right as you can without clipping the highlights.
Here you can see how the scan looks after the NEGAFIX corrections. We are quite close to a believable appearance, but there is still some more work to do. Especially during scenes with mixed light as in this night photographs we need to do some color correction.
Color Correction
We can see a green cast in the image. If there are no skin tones that need to look correct, use light grey areas as a reference for your color corrections. The densitometer tool of Silverfast can be helpful in this situation. I often switch from RGB readouts to Lab color values. In the Lab mode the a and b channel determine the color values where the L channel determines the lightness. In our example the value "-4" in the "a" channel stands for a green cast. The scene is also a bit too yellow. By clicking into the color wheel of the "Global Color Correction" tool you can compensate for this imbalance. The a and b channel of the Lab readout should read 0 when colors are neutrally balanced. By adding magenta and a little bit of blue we can achieve this goal.


This is the final look of the negative before we start scanning.
In the "Gradation" panel you can see how Silverfast has shifted the RGB curves in the previous steps. Other than in the video tutorial I will leave contrast and tonal adjustments to the next processing steps in Lightroom. But before we start scanning, go over all the settings and options to make sure everything is correct.
Here is a summery of the required settings.
- File name and location
- TIFF or PSD 16bit (48bit color) output
- Resolution (Epson V700 to V850 - 2400ppi)
- Scanning frame
- Negafix
- Color Correction
- iSRD selected for color negative film
- Multiexposure (ME) ON
Lightroom
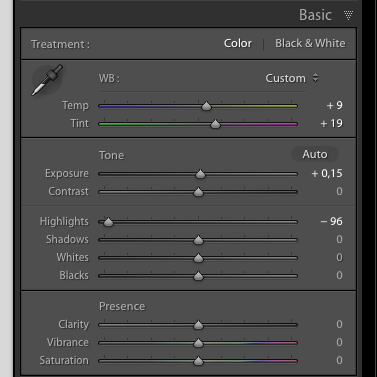
This is how the scan looks after import into Lightroom. Still some work to do. I often encounter additional color casts after the scan has been made, but nothing we cannot fix in Lighroom. The 16bit TIFF file gives us enough headroom for all color and tonal adjustments. A good tool for determining the residual color cast is the histogram tool.
Color Correction
So, why do we need to color balance again? This is a good question and I have spend many sleepless nights solving this issue. Sometimes scans look different after the scanning to the preview in Silverfast. The best explanation I have heard from Silverfast´s support teams that the scanner suffers from registration issues between the color channels. With my scanner this gets worse after a long scanning session when the scanner gets warm. I have no solution for this other than doing some more color balancing in Lightroom after the scan. A good and very helpful tool is the histogram. The overlay of color channels will get grey if the colors are balanced. We can see a slight cast towards cyan and blue in the midtones which can easily be corrected by moving the Temp slider towards yellow and the Tint slider towards Magenta.
Tonal Adjustments and Paper Curve
The contrast of a color print is mainly determined by the paper and the density of the negative. During analog color printing contrast of the final print can hardly be changed. In digital process of scanning we can make these changes but we also want to maintain the character of the photograph. It is very hard to almost impossible to recreate a correct paper curve. I always start with a certain gradation preset that ensures a contrast behavior to make the scan look similar to the Frontier or Noritsu scans.
Scan with final color correction and the contrast curve applied.
We also have the possibility to tweak the tonal values, the relationship between highlights, shadows and midtones. While this is an important step it can also deteriorate our final image. I always try to maintain the character of the film and the best way of doing this is to change the tonal relationships as little as possible. In my example I only recover some of the clipped highlights and increase the exposure slightly. The exposure slider can be used to change the brightness of the digital file. This is also known as density correction, but in our workflow it has obviously now impact on scanner exposure. But this step can be very helpful in order to get a constant look for each frame.
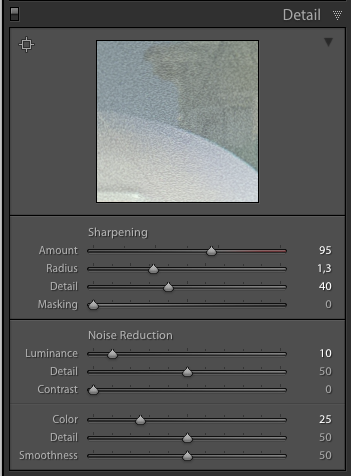
Sharpening and Detail
Sharpening is very important and can compensate for a loss of sharpness that occurs during the analog to digital conversion. The numbers from the screenshot above are a good starting point. I also added some Luminance noise reduction which compensates for sensor noise and is not intended to reduce grain.
We have now finished all our processing steps. Of course you can now add local adjustments to your image, but this is beyond the idea of this example.
Final scan with the Epson V700 using Silverfast AI Studio 8.8 and Adobe Lightroom.
Summary

The image on the left is how we started in Lightroom and the image on the right is our final scan. Let´s compare the Epson scan with the Noritsu and Fuji Frontier scans I have received from the MeinFilmLab.
Fuji Frontier 3637 x 3637
Noritsu 4832 x 4760
Epson V700 5263 x 5264
So despite the fact that all three scanners look a little bit different we also see that they are close to each other. The Epson scan is closer to the Noritsu but with some color tweaks during the scanning process the Fuji and Epson could easily be matched. Click on the images for a large version of the file.
Detail Comparison
Fuji Frontier 100% View
Noritsu 100% View
Epson V700 100% View
Conclusion
After all these files a final evaluation is due. I think all of these scans look good. While we have a very high resolution from the Epson V700 the amount of detail is the same as for the Noritsu scanner. However both the Noritsu and the Epson files show more noise and the Frontier files are cleaner. I also like the color and the contrast of the Frontier scan, but this is certainly subjective. The Frontier and Noritsu scanner have one big advantage over the Epson scanner as they can handle much denser files without getting noticeable artifacts. I was still surprised about the quality of the file derived from the Epson scanner and as I have done many many tests with the same scanner and other software I know from my experience that Silverfast is delivering the best quality.