

One of the biggest problems when scanning color negatives is, to get the color and contrast right. Normally the scanning software takes care of this task, but I know that many users often struggle with getting colors right. In order to help you with that I want to show you how to make scans which could easily be converted and adjusted in Adobe Lightroom. There is a very good plugin that helps you to get good colors and contrast from a basic scan done with either LaserSoft SilverFast or Vuescan. It was initially introduced for converting camera scans, but it can also be very helpful for converting scans from your flatbed or dedicated film scanner. Nate Johnson the creator of Negative Lab Pro (NLP) has updated the plugin to Version 2.1.2 which now enables you to effortlessly combine the power of a real scanner with the beauty and handsomeness of a really cool plugin. In this short tutorial I go through the required steps to give you the freedom of a non-destructive workflow in Lightroom combined with a very solid negative conversion tool.
Creating the Master Scan
A master scan is the foundation of your creative process. It contains all available data in a raw like file. In order to create this file you use you scanner and either SilverFast or Vuescan software. For this demonstration I am going to use SilverFast to create a DNG file that can be archived and later be processed in Lightroom. You only need to follow some very simple and basic steps to create the file.
Workflow Part I - The Master Scan
Mounting the Film
Mounting the film on the scanner surface can be achieved in various ways. It is very important to get it right to enable good scans. there are several things to watch out for. First, you need to work as dust free as possible. Second, make sure the film is as flat as possible and avoid any curvature of the film surface. This can be achieved with a good film holder. Use the film holder delivered with your scanner or maybe get a third party solution like the Bettterscanning film holders or as I do the Lomography Digitaliza film holder. In my opinion this is one of the best tools available for this job. In the images below you can also see that I have a self-made cardboard support to lift the film holder above the scanner surface. This ensures placing the film at the best focusing height and also avoids light flaring around the negatives. I highly recommend making some test scans to find the best height of the scanning material above the scanner surface for optimum focusing.


Steps
Make sure you have at least NLP in version 2.1.2 or later installed (this enables you to use the support for files created with SilverFast or Vuescan).
At present stage it is only possible to create 48bit HDR scan without an IR channel. The term HDR, which is is used in SilverFast to describe a raw like scan that has a gamma value of 1.0 and no color correction applied to it, is very misleading. It has nothing to do with modern HDR technique in digital photography that is used to increase the dynamic range of a digital image file. Unfortunately we cannot utilize the benefit of iSRD, the automatic dust and scratch removal feature of SilverFast. There is however a workaround described in the NLP forum.
After starting SilverFast make sure you select the following options:
film type set to “positive” (even though we are scanning negatives)
scanning mode set to “transparency”
choose 48bit HDR RAW (if this option is not available check you preference menu and enable HDR raw scanning there)
the file format should be set to DNG

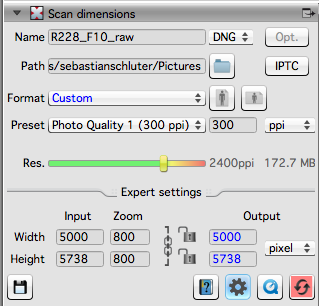

The next step will be a prescan and the selection of the scanning frame.
For further editing in Adobe Lightroom it is important to include parts of the unexposed film border. This will be used to color balance the scan before inverting it.
All other options can be left alone at their default or neutral value.
The multi exposure (ME) feature can be enabled if desired. In my tests this did change the final result, however sometimes with very dense negatives it can provide you with a slightly better image quality in the final file. In the the screenshot below ME is enabled.
Now you are ready to start the scan

Workflow Part II - Converting the Master Scan
Steps
You need to import the just scanned DNG file into Lightroom
In order to get contrast and color right you also need to prepare the file for conversion. Make sure you don’t apply any changes to the file except for the mentioned steps here. So no presets or anything before the conversion.
Select the scanned image and go into the menu and select file > plugin extras > update vuescan / silverfast dngs (in the screenshots provided below you can see th eGerman version of Lightroom).
now follow the prompts on your screen
it is important to update the metadata after this process. Instructions are given by the plugin. If you see the exclamation mark in the metadata icon at right top corner of the preview, you need to click on the icon and choose load metadata from file.
Once the operation has been completed you should check that the correct profile is assigned to the file. Under the profile tab in Lightroom check that the Negative Lab V.21 profile hass been assigned.
Next step is white balance correction. Use the white balance tool to sample parts of the film border by clicking on the unexposed parts of the film. The film border should turn white.


Now it´s time to crop the image and exclude the film border.
In some cases it can be useful to change the overall exposure to distribute the tonal values across the midtones in the histogram
Select the plugin from the menu
Once the interface shows you have the option to change the behavior of the plugin for the negative conversion.
Make sure the starting profile is Vuescan/SilverFast
Under Color Model you can change the conversion method. I normally stick to Frontier.
Pre-Saturation can do some changes to the conversion as well. You can play around with it and see if it makes the scan look better.
Border Buffer is used when you need to keep parts of the film border in the final scan and you did not exclude the film border during cropping. This is required to make sure the algorithms of NLP will work correctly.


Workflow Part III - Final Adjustments
Steps
Once you hit convert, NLP will do its magic and convert the file for you. The next prompt will allow you to make some basic changes to color and tone.
Select the tonal profile to your liking.
Apply color correction
You can also choose a basic sharpening algorithms. All operations are based on the Lightroom tools. This is a matter of personal taste.
APPLY the conversion — you can also save an additional Tiff file of the converted image
Conclusion
This is just a tutorial on how to implement the NLP plugin into your scanning workflow when using a film or flatbed scanner. It is not tutorial on how to use the plugin. You can find way more information on how to use Negative Lab Pro on Nates website. I highly recommend checking the tutorials there.