
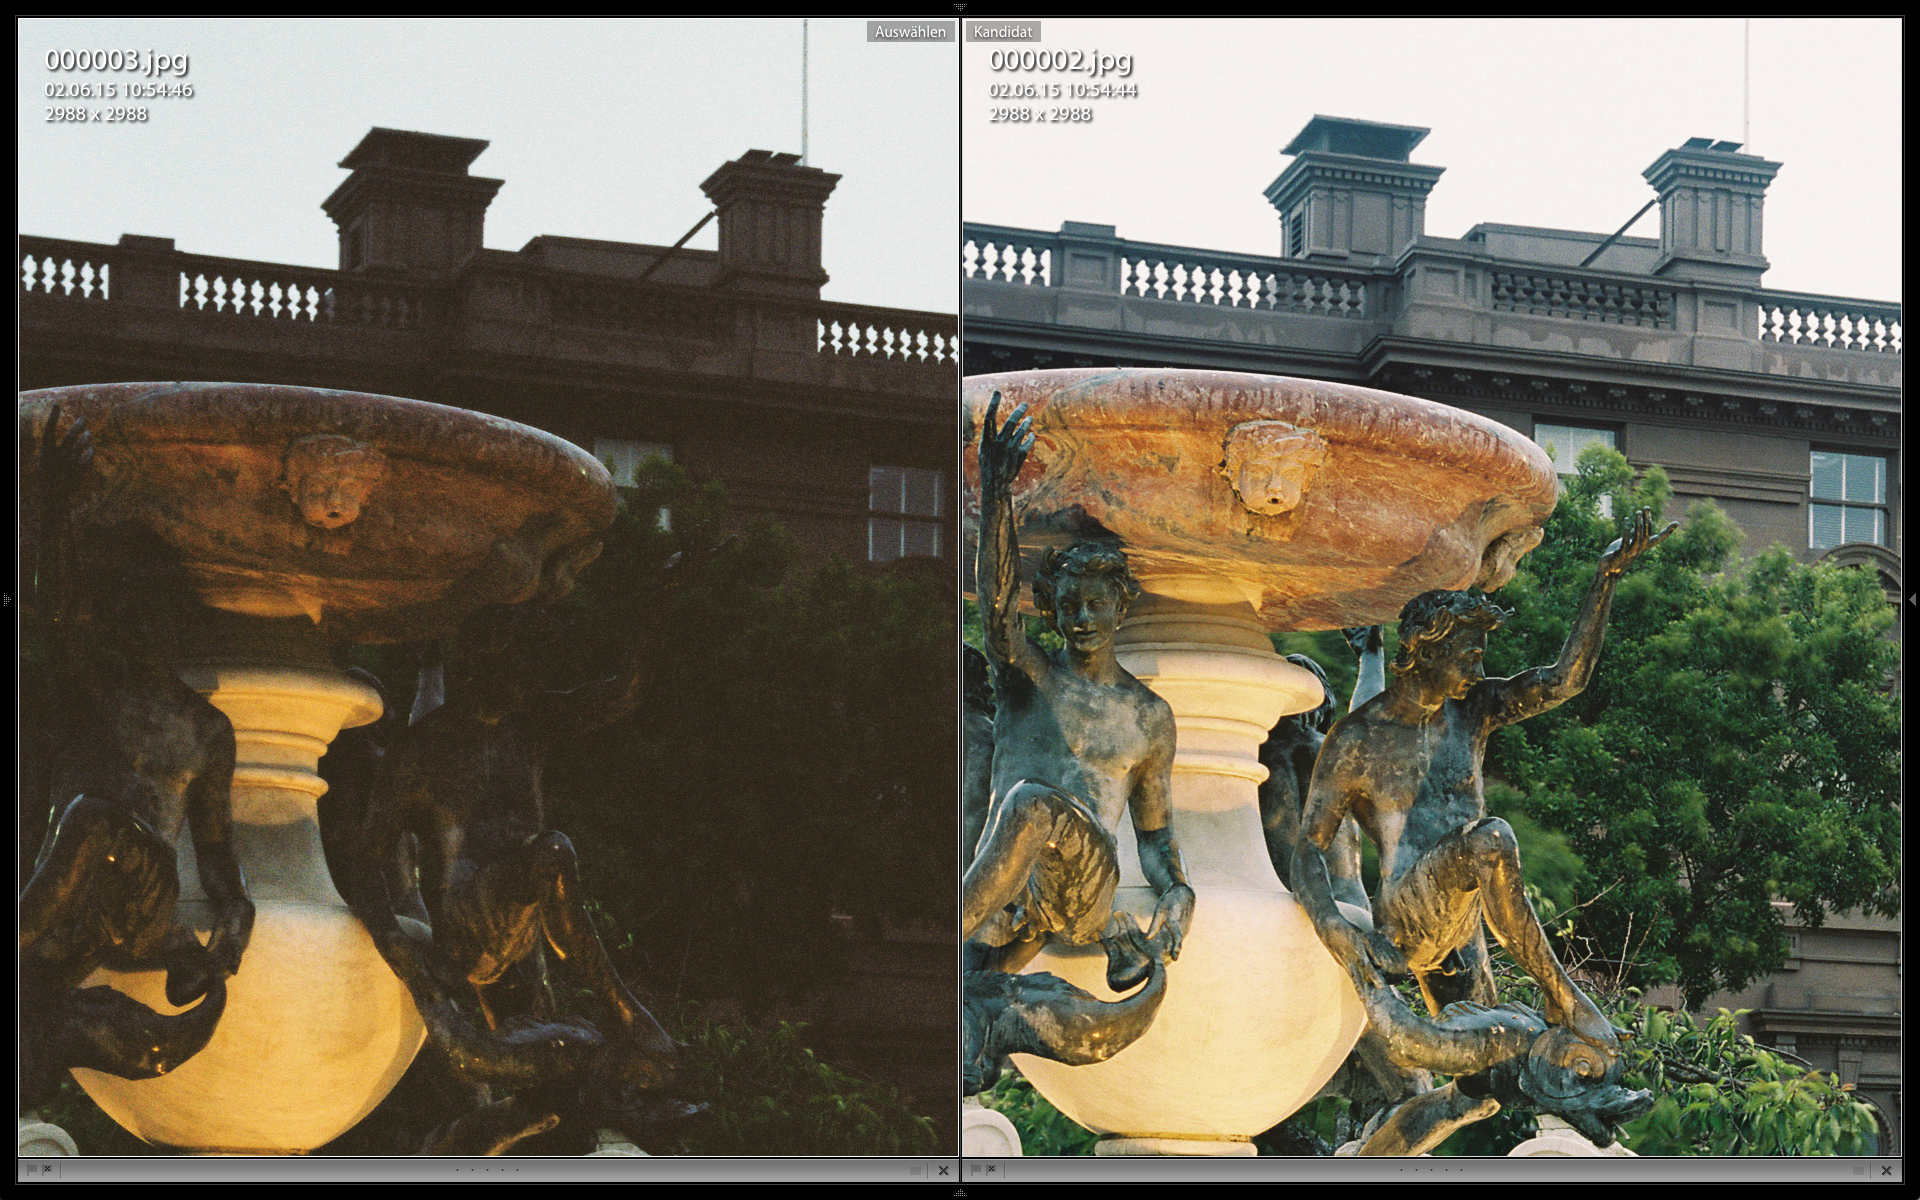
The way we expose film has a tremendous amount on the quality and mood of the final photograph. Of course exposure affects image brightness and contrast, but also quality and color.
Carmencita Film Lab and photographer Johnny Patience both did a wonderful exposure series to demonstrate the effect of under and overexposure to film. Please follow the links to check their series and read their recommendations. You can also find a good film guide from "Mein Film Lab" which explains a lot about the different characters of film. Unfortunately it is only available in German so far.
Underexposure and Image Brightness
Let´s talk a bit about how exposure affects our scanning process. All film have box speeds, a recommended ISO that ensures good shadow detail when exposed accordingly. Color negative film however has a big exposure latitude that is even more usable when film is scanned and not printed in the darkroom. Exposure latitude just means the usable range for which a certain film still provides good results. The biggest problem with negative film is underexposure. In the moment we open the shutter, light falls on the film and densities start to build up. If you close the shutter too early, not enough light hits the film and the negative will become too thin. I have mentioned in my previous blog post that negative film has a relatively flat response curve. When underexposing film we only use a small portion of the response curve and a lot of the information we would like to capture falls in the lowest section of the curve, the so called toe. Here information is lost or not enough tonal separation is provided. In the worst case we even don´t get enough light in the shadows to build up any density on the film. When scanning thin negatives the recorded data will be expanded. As only a small tonal range will be expanded for underexposed film, we inevitably loose data and our final scan show tonal break ups, posterization and noise. Less data means less image quality. Noise is actually inaccurate scanner data that gets amplified during the massive tonal expansion that is required when inverting the negative data.
Scanner exposure and image brightness
My initial thought was that underexposed images are by definition darker. Well, this is only half the truth. While we captured less data and build up less density, the final scan is of course a bit darker, but the more significant difference is the loss of information. Thin negatives show a narrow band of densities, resulting in more contrast, much darker shadows and less image quality. Digital image data can be amplified, which means we increase image brightness. In the scanning world this is often called density correction and is a simple mathematical operation which does not effect scanner exposure.
When printing a negative in the darkroom we can alter image brightness by varying the exposure time. But we are limited, as we cannot go beyond the capability of the paper. We cannot get whiter parts than the paper or darker blacks than the Dmax of the paper. Short exposure in the darkroom will result in a very bright image without good shadows. Increasing exposure time in order to get good shadows will result in an overall darker image. The final decision of what exposure time will be used in the darkroom lies with the printer.
Scanners are a bit different. The scanner software automatically adjusts for varying negative densities by altering exposure time or lamp brightness. This helps to scan differently exposed negatives perfectly. Each negative has a optimum scanner exposure. This is mostly determined during pre-scan and set to maintain image detail in the CCD data for the thinnest part of the negative. Any departure from the optimum scanner exposure will lead to data loss and is not really helpful to alter mood, contrast and brightness. If we want a different image brightness we need to do this in digital post-production.
So the achieved image brightness is related to initial film exposure, but not alone. Basically, less exposed negatives tend to look darker and a bit moodier with more contrast, whereas overexposed negatives tend to look brighter with a more airy feel to it. Keep this in mind when exposing your film. But even dark scans can be brightened in software. Unfortunately the result will look less natural and image artifacts will be amplified. This option should only be used for small adjustments.
Why can´t we just increase scanner exposure time in order to get brighter scans from a thin negative or reduce scanner exposure to get darker scans from dense negatives?
I briefly covered this in the paragraph about scanner exposure. Let's explore this a bit further. It honestly took me quite a while to answer this question myself. The idea seems very simple. Obviously digital CCD sensors act differently to analog printing paper. Due to the nature of digital data storage we can store more tonal values in the brighter image regions (following the idea of expose to the right) and a digital sensor cannot go beyond its capability. There is a maximum brightness before we loose information that simply cannot be captured. Scanner exposure will be determined by scanning the thinnest parts of the negative as bright as possible to collect the most tonal values possible. If we reduce scanner exposure, data will be lost. If we increase scanner exposure, data will be lost as well. There is really only one exposure that gives you no blown highlights and still good enough tonal separation. Say, we know that we loose data and still want to underexpose the scan, we run into trouble when processing the scan. Even if the image might be brighter, the lost data cannot be restored. A careful digital brightness correction would give us the same brightness and better quality.
Overexposure and color shifts
Very dense negatives require longer exposure in scanner. Due to the nature of a color negative film, we will not loose highlight detail by exposing longer. But the benefit of collecting more image data by exposing longer in camera should not be overdone. Overexposed negatives can introduce new problems during scanning. Longer exposure times will increase scanner noise and some scanners tend to flare when dense negatives require longer exposure.
During these long exposure times the CCD elements of the scanner get warm and produce heat. The digital file gets inaccurate which can be seen as noise in the final scan. This however is not true for every scanner and most of the scanners can handle overexposure of CN film to a certain amount very well.
During overexposure not all three color layers of the film built up densities equally. This can lead to significant color shifts. Of course these shifts can be corrected and therefore photographers use overexposure of film to their benefit. Color tend to get softer and more beautiful. This is what film is known for today. The soft and muted tone that look so beautiful when scanned correctly. However going to far is not desirable. High densities can lead to staircase effect and to problems with color shifts.
See my blog post on "Scanner Banding" for details about the staircase effect and scanner flare.
Final Conclusion
The tonal distribution of the original negative will not be changed regardless of printing the negative or scanning it. By the decision of how much light we allow to fall on the film, we influence tonal distribution first, image brightness and contrast second. The overall mood and feel is closely related. While we can do a lot with digital post-processing, the initial tonal distribution always affects the final image.
So my advice is simple. Don´t underexpose! If you need to underexpose, ask your lab to push the film by one stop. If you don´t know what "pushing" means, read this post by Carmencita Film Lab about pushing and pulling film. If you have the choice, rate your color negative film for a slight overexposure. I rate Fuji Pro 400H at EI 100 (EI stand for exposure index), Kodak Portra 400 at EI 200 and Portra 160 at EI100. Rating a film is as simple as putting something different than the box speed in the exposure meter. This will result in a slight overexposure by up to 2 stops. Additionally you need to expose more carefully if you plan to scan at home with a flatbed scanner.
I recommend to read Johnny Patience blog post on "Metering For Film" to get more information about film exposure. He will provide you with further details and examples.
I hope I was able to shine some light on the way we need to expose color negative film for scanning.