Introduction
When I started scanning film, I thought it would be an easy process. I severely underestimated the learning curve required to become a good scanner operator. I intentionally use this term, as it precisely describes what you do when scanning film. Beyond the basic operation of the scanner and software, you need to make basic artistic decision when scanning, similar to those made by master printers in the traditional darkroom.
With this post I will start a series of blog posts and screencasts that will teach you how I handle scanning. I will provide you very deep insights to my workflow. After a very long time of "try and error" I finally settled on a workflow that allows me to have full control over the look of my scanned negatives.
In this series of tutorials will focus on scanning color negative film, which is often claimed to be the most difficult film to scan. I will cover scanning of black and white negative film thereafter, but the main focus will be on color film. I am using a very common Epson V700 flatbed scanner. Maybe this scanner is not perfect, but its versatility and the comfortable price range makes it a perfect scanner to start out with. My initial idea was to get similar results from a simple consumer scanner than from a brilliant Fuji Frontier minilab machine. When establishing this workflow, scans from the Fuji Frontier scanner have always been my reference.
Software
Scanning is always divided into two parts. The first part is recording all image data from the film. This is what a scanner basically does, it records luminance values and the scanner software is controlling this process. However there is very little we can do to adjust this process. The second part of the scan process is post-processing. Most scanning software has built in post-processing features. Some of them are very helpful other things could be done better in other software.
It is important to understand the nature of this 2 step process. First is scanner control, second is post-processing. After trying a lot of the software available today for scanning, I finally decided to solely trust in LaserSoft Imaging´s Silverfast software. OK, it is not the cheapest and it needs to be purchased for every scanner separately. The price tag is the biggest problem when recommending this piece of software, but when you are serious about scanning film, you will not get better results from any cheaper software.
Silverfast provides a dedicated version of its software that is programmed especially for one single range of scanners. The big benefit from this approach is, all options and features are specifically designed for the scanner and will enable you to get the most out of this combination. Compared to other scanning software, Silverfast´s main advantage is the ability to get the best detail rendering possible for the scanner you are using. It also has a built in feature called Negafix, which allows you a significant amount of control on how your negatives are interpreted. Once you understand how these controls work, the rest of the scanning process is rather simple.
Additionally Silverfast allows full control over all hardware based scanner settings. It also provides all post-processing features required for brilliant output. Sometimes it is not obvious which panel is controlling the scanner and which one is doing post-processing. In my personal workflow I do most of the post-processing in Silverfast, but I postpone some final tweaks to Adobe´s Lightroom. This raw converter shines when it comes to tonal adjustments, noise reduction and sharpening. This is why I decided to make these adjustments not in Silverfast butrather in Lightroom.
Silverfast Preferences
Before we get into scanning, I need to show you the preferences I use for Silverfast. The version I use is Silverfast AI Studio 8.5. Of course there are some differences between Mac and Windows, but I am quite confident that the windows menu is similar to the Mac. Under the Silverfast 8 tab you will find the preference entry.

The "General" tab will cover some very basic settings. Of course all of my settings are only recommendations. If you think they are not working for you, feel free to setup Silverfast the way you like.
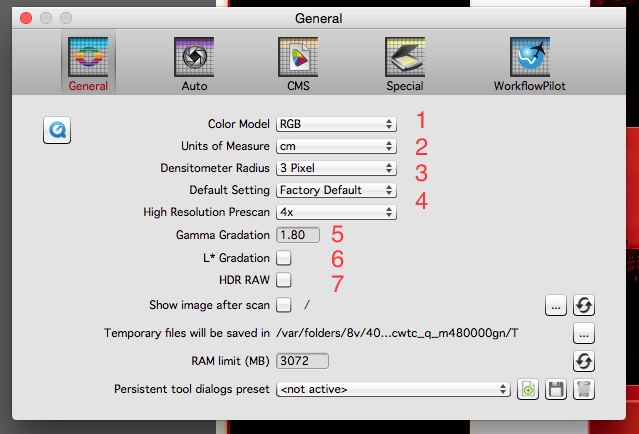
General
- You can choose either RGB or CMKY color spaces for internal reference inside Silverfast. I think as a photographer RGB works better. This setting has no influence of the color space of the output file.
- Units of measurement are completely up to you.
- Densitometer radius, describes the amount of pixels that get averaged for a color value readout in densitometer panel inside Silverfast. For precise color correction this panel will be very helpful. A setting of 3 pixels is good for an average readout.
- High resolution prescan can be set as required. I think 4 gives you a good balance between time required for the prescan and usability.
- Gamma gradation is a complicated thing, which I will not cover to its full extend here. I often change this value during scanning. It has nothing to do with monitor gamma, but it severely changes the look of your scans. I think 1.8 is a good starting point, but this is definitely a matter of taste. Higher values give you brighter scans with less contrast, lower values give you darker scan with more contrast.
- For my workflow I leave the L* Gradation checkbox unchecked.
- Same for the HDR raw checkbox. This is a feature that is important when using the Silverfast Archive version which allows you to do linear scans, which can be processed in Silverfast´s HDR software.

Auto
"Auto Theshold Highlights" defines the amount of highlight clipping allowed by the auto algorithm of Silverfast. I don´t use the auto function, but just in case I set the value to zero to avoid any kind of highlight clipping
Same box for the shadows.
Highlight Offset defines the the brightest point of the image in percent. Leaving it at zero will allow full control over the full tonal spectrum. I prefer to take care for tone-mapping if required later in my workflow.
- Shadow Offset defines the darkest point of the image in percent. Set to zero again, for the reason stated above.
- Color Cast Removal will determine the amount of color cast that will be removed when the CCR function is active. I generally leave the CCR on and this is why I want 100% color cast removal here. I presently don´t see any reason for not allowing the software to correct for color casts. Artistic decisions on color balance will be done in a seperate step anyway.
- Auto frame inset tells the software that pixels close to the frame border will be disregarded when doing any kind of auto-function. This is helpful as the unexposed area around a negative will severely offset the algorithms used by Silverfast. The amount describes this area in percent from the frame size you are using. The visualize checkbox will show you a dashed line insight the scanning frame indicating this area.
- This slider is referring to the auto-function again and tells Silverfast to generally make the images brighter by a certain amount. I leave this option set to zero.
- Same for auto adjust darker:
- I also leave the auto contrast box unchecked.
- As I don´t want any kind of auto image optimization I set this dialog box to none.

CMS
Color management is again an inmportant topic. After researching for the best options for color film I settled on the settings shown above.
- The Input Working Space refers to the color profile used to interpret the scanner output data. If "Color Sync" (Mac) or "ICM" (Windows) is selected the scanner profile chosen under point 4 "Input Profile" will be used to convert scanner data.
- "Color Snyc" or respectively "ICM", will make sure the monitor profile for your display will be used for displaying color values. It is quite important to used a calibrated monitor as many of the decisions when scanning color negative film are based on visual judgments. If the display is not calibrated this is more or less guess work. So I highly recommend using a calibrated monitor and setting this option to "Color snyc" respectively "ICM".
- Working Color Space is set to RGB.
- The input profile is grayed out when select negative as input media. This is a normal behavior of Silverfast as the scanner profile will not be used for this kind of scanning.
- I normally use Adobe RGB for output. This seems to be a good balance between the rather wide ProPhoto RGB and narrower sRGB. As I import my scans into Lightroom after scanning the final export color space will be determined there.
- Gamma Gray 2.2 works well for black and white film.
- If you plan to print directly from Silverfast you can select the output printer profile here. I don´t use Silverfast for printing presently.
- I use "perceptual" as my preferred rendering intent.
- Check the box for embed color profile. This is important to let Lightroom know how this file should be interpreted. Double check that Adobe RGB is displayed here.


Special + Workflow Pilot
The settings in those two tabs are rather irrelevant for my workflow and I just leave them as they are.
Now we have covered all the settings for the workflow and in the next post we get things started. Hope this was helpful. If you questions or even better recommendations, please leave a comment below. The workflow is not set in stone and subject to change. Any recommendations are welcome.